Finishing requirements for wall mounted tapestries
Labelling
Your artwork should be labelled on the rear, with the top of the work clearly indicated. Please include: artist’s name and artwork title. Please label diptychs and triptychs: 1/3, 2/3, 3/3, to ensure they are hung in the correct order.
Hanging requirements
The exhibition with travel to four venues and there are two different hanging systems and both need to be supported.
Drill and Fill hanging system:
The first two venues use the drill and fill hanging system. All work must be screwed to the wall.
To support this, wall mounted tapestries must have mirror plates or another mechanism with holes for screws to go through and into the wall.
A mirror plate is a piece of metal (usually brass) designed to lie flat against the back of a picture frame or batten, it is then used to attach the picture frame to the wall using screws.
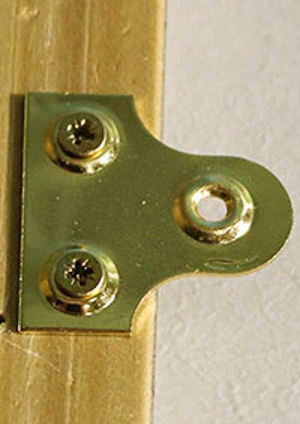
View from the rear of mirror plate attached to frame
Another option is to extend the batten beyond the edge of the tapestry and drill holes in it that the screws can go through into the wall.
Considerations:
Type of plate: You MUST use a plate which is suitable for the weight of the artwork.
Type of wood: If the wood is not robust screwing anything into it might split it. Softwoods or compounds are more susceptible to splitting.
Clip rail hanging system:
The other two venues use a clip rail system; hooks are attached to cords hung from picture rails attached to the wall.
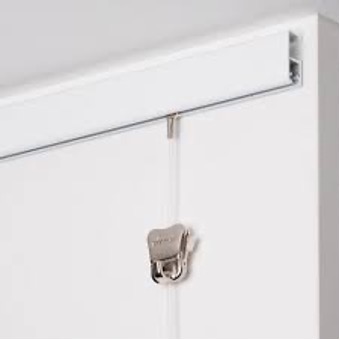
Rail with one 2mm filament cord and smartspring hook

2mm filament cord and smartspring hook
To support this system, wall mounted tapestries must either have loops that the hooks can fit through (usually d-rings) or a hole in the batten that the cord can fit through (the hook unit will then be used to hold up the batten without using the hook itself).
A d-ring has a flat piece of metal with a single screw hole to attach it to the work and a ring that hangs loose. D-rings are the most common loop used to hang work on the hooks. Each tapestry must have at least two d-rings.

D-ring and screw to attach it to a batten at the back of the tapestry
Tip: Attaching the d-rings to the side of the batten closest to the tapestry, rather than the wall, will reduce the tipping effect at the top of the tapestry.